- 0116 5020019
- Help@chessgammon.co.uk
- Over 20,000 fulfilled orders


The knight piece can easily go unnoticed during a game of chess, due to its unusual form of attack and direction. However, this can be used in your advantage when planning an attack. This piece doesn’t often get involved in a direct checkmate, but can effectively be used in preparation and setup of a checkmate.
What will this blog post cover?

The Knight piece has two main characteristics; the first being, it is the only piece on the board that can move beyond chess pieces in front. Secondly, Each time the piece moves, it has to move from a darker square on the chess board to a lighter square.
The value of the knight is three pawns, or in other words, 3 points. Losing the Knight piece to a pawn leaves you at a significant disadvantage. However, on the other hand, sacrificing your Knight for a Rook which is worth 5 points is advantageous.
Now the Knight piece moves in somewhat of an awkward fashion. Some describe this to be an ‘L’ shape which is easy to remember.
The reason this ‘L’ shape is often described is because the knight can make the following moves; this can be either 2 steps vertically and 1 step horizontally or 2 steps horizontally and 1 step vertically as demonstrated by the diagram visible below.


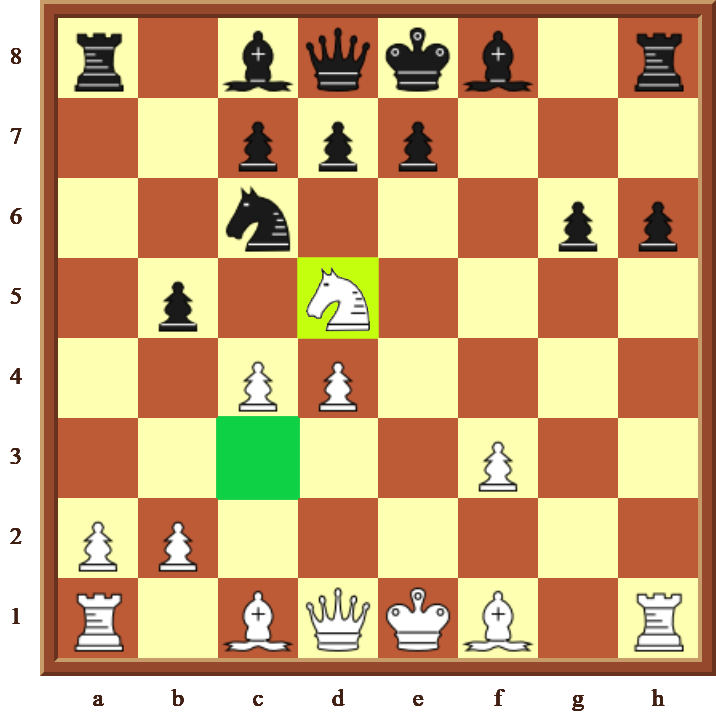
As mentioned, the Knight piece can ‘jump over’ other chess pieces and is the only piece in the game that has this characteristic. See in the example below:

Referring back to a rule explored earlier, the knight is positioned at D4 on a darker square and will end up on C2, a lighter square.
The Knight very much eliminates an opposition chess piece by simply moving onto the square. In turn, this opposition piece is eliminated.
Every game of chess is unique and unpredictable; an important part of having a successful win is adapting your critical thinking to the game board at any given moment and being prepared to improvise and adapt your game plans to deliver a successful checkmate. These calculated moves will help you defeat your opponent in your game of chess, utilising your knights to their maximum.
Positioning of the Knight
We need to realise the knight piece is quite limited in terms of movement and is unable to attack swiftly across from the back rank of the chess pieces, therefore we need to place this piece where it is highly effective. The limited range of attack should mean the knight is best positioned towards the centre of the board, giving it further option to attack more valuable pieces that come within range and eliminate unexpectedly.
Remember, the knight can attack both forwards and backwards, therefore the piece being close to the centre allows easier movement. Your aim will be to move this piece as close to the centre as swiftly as possible but at the same time use pawns to protect and immediate attack from long range opposition pieces, such as the rook and bishop pieces.
Early Movement
An early movement of your knight piece towards the centre of the board can allow for much quicker and greater control when eliminating the advancing pawns. This will leave a greater space for your rooks and bishops to attack in long range.

Leaving the Knight Vulnerable
Remember, the knights’ next move must be the opposite colour of where it is currently positioned. Suppose this knight is on a darker square, it’s next legal move can only be on a lighter square. However, should there be one of your own chess pieces here, it would limit the movement of the knight. It can either be moved in a different direction entirely or you can move on to a different play of attack.
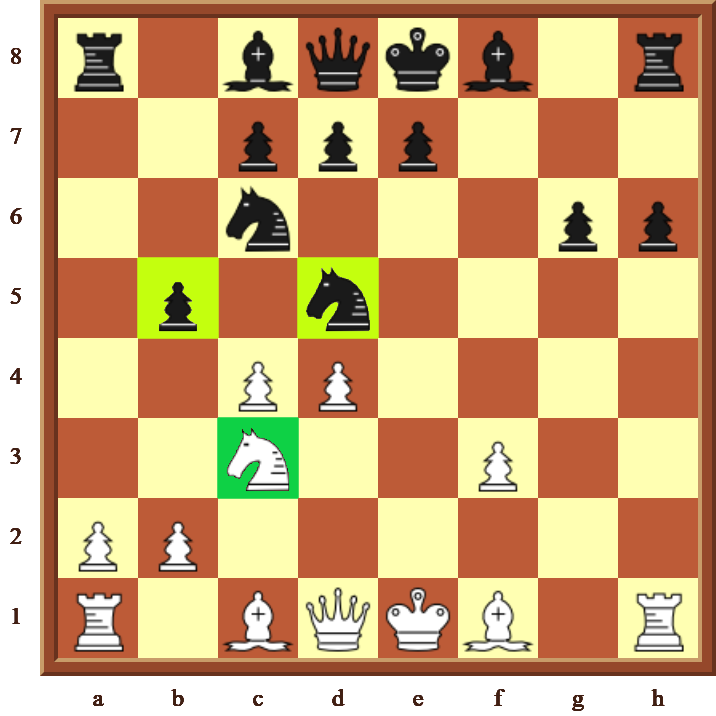
Forking
Due to the awkward movement of this knight piece, it is very easy to be able to attack multiple chess pieces at any one time leaving the opponent confused. This can be quite frustrating for the opponent as they would be wasting time on deciding, further rushing them into a rash decision. This can sometimes result in you attacking the opposition Queen and King simultaneously. Below is an example of a Fork execution.
Your white knight has the option to attack the black pawn and black knight forming a ‘fork’ position. In this circumstance, taking out the black knight would leave you at the greatest advantage.